
Garlic Bliss Hummus with Crunchy Pita Chips: A Flavorful Delight for Every Occasion
Introduction
In the world of dips, hummus reigns supreme, and our Garlic Bliss Hummus is a true testament to this beloved dish. Hummus, a staple in Middle Eastern cuisine, has transcended cultural boundaries to become a favorite across the globe. This creamy, versatile dip is not only delicious but also packed with nutrition, making it a go-to choice for health-conscious eaters. Our Garlic Bliss Hummus takes this classic recipe to new heights with the rich flavor of roasted garlic, creamy chickpeas, and a touch of tahini, creating a mouthwatering experience that is hard to resist. To elevate your snacking experience further, we pair this delightful hummus with homemade crunchy pita chips, which provide the perfect textural contrast.
Whether you’re hosting a gathering, prepping for a picnic, or simply indulging in a cozy night in, this recipe is designed to impress. Easy to prepare and bursting with flavor, it’s a culinary delight that caters to various occasions. Let’s dive into the details of how to create this irresistible dish, starting with an understanding of the key ingredients that make Garlic Bliss Hummus truly special.
Understanding the Ingredients
To truly appreciate the depth of flavor in Garlic Bliss Hummus and its accompanying pita chips, it’s essential to understand the core components that contribute to its unique taste.
– The Role of Chickpeas in Hummus
Chickpeas, also known as garbanzo beans, are the star ingredient of hummus. They provide a rich source of protein, fiber, and essential nutrients, making hummus not just a delicious dip but also a nutritious one. The creamy texture of blended chickpeas forms the base of the hummus, allowing it to be smooth and spreadable. When cooked properly, chickpeas have a mild flavor that absorbs the seasonings and additional ingredients beautifully, making them the perfect canvas for our Garlic Bliss Hummus.
– The Magic of Roasted Garlic
Garlic is a fundamental flavoring agent in many recipes, but roasting it transforms its pungent raw taste into a sweet, mellow flavor that enhances the overall profile of the hummus. Roasting garlic brings out its natural sugars, creating a caramelized effect that adds depth and complexity to the dip. This process not only softens the garlic’s sharpness but also infuses the hummus with a warm, aromatic essence that is both comforting and irresistible.
– The Importance of Tahini
Tahini is a paste made from ground sesame seeds and is a staple in authentic hummus recipes. It adds a nutty richness and smooth texture, contributing to the overall creaminess of the dip. The unique flavor of tahini complements the chickpeas and roasted garlic, creating a harmonious blend that elevates the hummus to new heights. Additionally, tahini is rich in healthy fats, vitamins, and minerals, making it a beneficial ingredient for your overall health.
– Flavor Enhancers: Olive Oil, Lemon Juice, and Cumin
Extra virgin olive oil plays a crucial role in the flavor profile of Garlic Bliss Hummus. Not only does it provide healthy fats that promote heart health, but it also adds a fruity richness to the dip. Fresh lemon juice is another essential component; it brightens the flavors and adds a refreshing acidity that balances the creaminess of the hummus. Finally, ground cumin imparts a warm, earthy note that rounds out the flavor profile, making each bite more complex and satisfying.
– Pita Chips: A Crunchy Companion
No hummus is complete without a satisfying vehicle for scooping! Whole wheat pita chips not only add a delightful crunch but also complement the creamy hummus beautifully. Making your own pita chips is simple and allows you to control the seasoning, ensuring they are perfectly seasoned and crisp. The contrast between the crunchy chips and the smooth hummus creates a delightful textural experience that is sure to please your palate.
Step-by-Step Guide to Making Garlic Bliss Hummus
Crafting the perfect hummus starts with the right technique. Follow these steps to ensure your Garlic Bliss Hummus is creamy, flavorful, and utterly addictive.
– Roasting the Garlic
The first step in making Garlic Bliss Hummus is to roast the garlic, as this will provide the foundational flavor of the dip. Start by preheating your oven to 400°F (200°C). Take a whole bulb of garlic and peel away the outer layers, leaving the individual cloves intact. Slice off the top of the bulb to expose the tips of the cloves. Drizzle a teaspoon of olive oil over the exposed cloves, and wrap the bulb in aluminum foil to create a sealed packet. Place the wrapped garlic in the oven and roast for about 30-35 minutes, or until the cloves are soft and golden brown. Once roasted, allow the garlic to cool slightly before squeezing the cloves out of their skins. The roasted garlic should be sweet, tender, and aromatic, ready to be blended into your hummus.
– Creating the Hummus Base
With your roasted garlic ready, it’s time to bring together the ingredients for the hummus. In a food processor, combine one can (15 ounces) of drained and rinsed chickpeas, the roasted garlic cloves, ¼ cup of tahini, the juice of one large lemon, and 2 tablespoons of extra virgin olive oil. Add a teaspoon of ground cumin, along with salt to taste. Begin processing the mixture on high speed until the ingredients are well combined and start to form a paste.
To achieve the desired creaminess, you may need to scrape down the sides of the bowl periodically. This ensures that all ingredients are evenly mixed. For an extra smooth texture, consider adding a few tablespoons of cold water, one at a time, while continuing to blend until you reach your preferred consistency.
– Adjusting Consistency and Flavor
After blending, it’s essential to taste your hummus and adjust the consistency and flavor as needed. If the hummus is too thick, continue adding water a tablespoon at a time until it reaches the desired creaminess. Similarly, if you feel it lacks brightness, add more lemon juice or a pinch of salt to enhance the flavors. Keep blending until everything is smooth and well incorporated. The result should be a luscious, creamy dip that is rich in flavor and perfect for serving with your crunchy pita chips.
Now that you have the essential groundwork laid for your Garlic Bliss Hummus, you’re well on your way to impressing your family and friends with this delightful dish. In the following sections, we will delve deeper into the process of making the crunchy pita chips and explore creative ways to serve this fantastic hummus. Get ready to indulge in a flavor-packed experience that will elevate your next gathering or meal.
{{image_2}}
Making the Crunchy Pita Chips
Elevate your hummus experience with homemade chips that are not only delicious but also a healthier alternative to store-bought options. Follow these steps to create the perfect crunchy pita chips that pair beautifully with your Garlic Bliss Hummus.
Selecting the Right Pita Bread
The foundation of your pita chips starts with the bread itself, and selecting the right pita is crucial. Whole wheat pita is a fantastic choice due to its richer flavor profile and enhanced nutritional benefits over regular white pita. Whole wheat pita bread is packed with fiber, vitamins, and minerals, making it a healthier option that can help you feel fuller for longer. The nuttiness of whole wheat also complements the garlic and tahini flavors of the hummus, ensuring a harmonious taste experience.
When choosing your pita bread, look for brands that use minimal ingredients. Ideally, the ingredient list should include whole wheat flour, water, yeast, and salt. Avoid those with preservatives or artificial additives to keep your chips as wholesome as possible.
Seasoning Techniques for Maximum Flavor
To take your pita chips to the next level, seasoning is key. Here’s how to effectively season your pita chips for maximum flavor:
1. Garlic Powder: Since you’re making Garlic Bliss Hummus, why not carry that garlic flavor into your chips? Garlic powder is a convenient way to add that robust taste without the hassle of fresh garlic.
2. Smoked Paprika: This spice adds a depth of flavor with a hint of smokiness that complements the garlic beautifully. It also gives your chips a lovely color that makes them visually appealing.
3. Salt: A sprinkle of salt enhances all the flavors, bringing the seasoning together. Use sea salt or kosher salt for a delightful crunch.
To season your chips, you can either mix the garlic powder, smoked paprika, and salt together and sprinkle it over the chips before baking or toss the pita triangles in olive oil and then coat them with the seasoning mix. Both methods will yield delicious results.
Baking to Perfection
The baking process is where you transform your seasoned pita into crispy chips. Follow these tips for the best results:
1. Preheat Your Oven: Always start by preheating your oven to 375°F (190°C). This ensures that your chips cook evenly and achieve that perfect golden color.
2. Arrange Your Pita Chips: Cut your whole wheat pita bread into triangles (like slicing a pizza) and arrange them in a single layer on a baking sheet lined with parchment paper. Avoid overcrowding the pan, as this can lead to uneven baking.
3. Baking Time: Bake your pita chips for about 10-15 minutes, flipping them halfway through to ensure they cook evenly. Keep a close eye on them, as they can go from perfectly crispy to burnt quickly.
4. Cooling: Once baked, let your chips cool on the baking sheet for a few minutes to maintain their crispness. They will continue to harden as they cool.
Presentation Ideas for Serving
Making your dish visually appealing enhances the overall dining experience. Here are some creative presentation ideas for serving your Garlic Bliss Hummus and crunchy pita chips.
Serving Suggestions
When it comes to serving, presentation is just as important as taste. Here are some ideas to elevate your serving style:
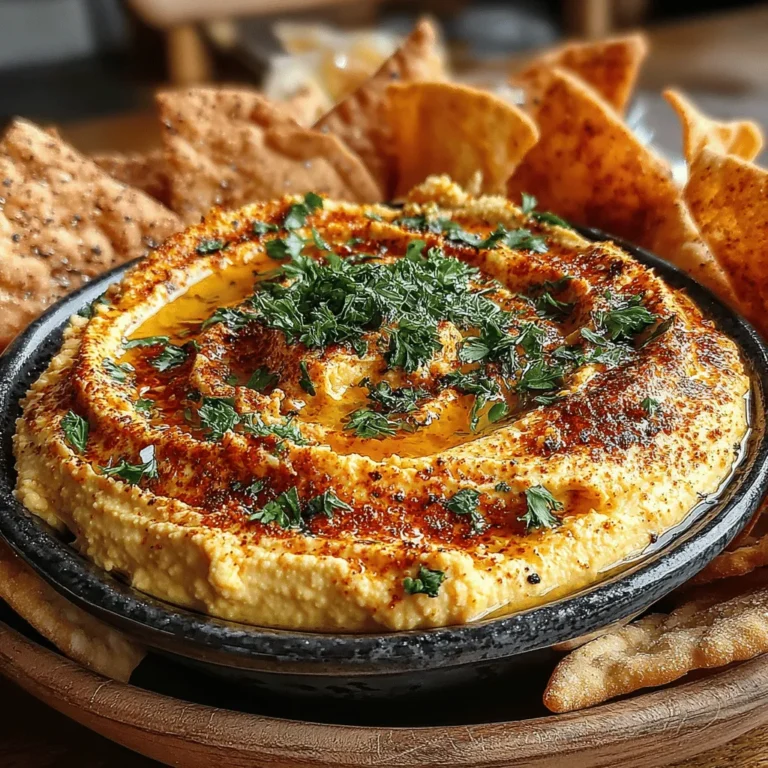
– Garnishes: A sprinkle of fresh parsley or a drizzle of olive oil on top of your Garlic Bliss Hummus can add a pop of color and freshness. Additionally, a sprinkle of smoked paprika can tie in the flavors from your pita chips.
– Serving Vessels: Consider using a rustic bowl for your hummus and a separate small dish for the pita chips. This separation allows your guests to dip as they please while keeping the presentation neat.
Creating a Rustic Display
For a more inviting presentation, consider creating a rustic display. Here are some tips to achieve that charming look:
– Wooden Board or Platter: Use a wooden cutting board or a large platter to arrange your hummus and pita chips. This natural look adds warmth to your table setting.
– Arrangement: Place the hummus in the center of the board, surrounded by a generous pile of crunchy pita chips. You can add some fresh veggies, such as carrot sticks or cucumber slices, around the edges for extra color and crunch.
– Dipping Accents: If you have any leftover seasonings or garnishes, sprinkle them around the dish to create a cohesive look. A few lemon wedges can also add a refreshing touch and invite guests to add a spritz of acidity to their hummus.
Nutritional Benefits of Garlic Bliss Hummus
This Garlic Bliss Hummus is not only delicious but also packed with nutritional benefits. Let’s take a closer look at the key ingredients and their health advantages.
Nutritional Profile of Hummus
Hummus is primarily made from chickpeas, tahini, and garlic, all of which contribute to its impressive nutritional profile:
– Chickpeas: A fantastic source of plant-based protein, fiber, and essential vitamins like folate. They are known to support digestive health and help maintain stable blood sugar levels.
– Tahini: Made from ground sesame seeds, tahini is rich in healthy fats, calcium, and magnesium. It also contains antioxidants that can help combat inflammation.
– Garlic: This aromatic ingredient not only enhances flavor but is also known for its potential health benefits. Garlic can help boost the immune system, lower blood pressure, and improve heart health.
Health Benefits of Roasted Garlic
Using roasted garlic in your hummus not only adds a mellow, sweet flavor but also brings numerous health benefits:
– Antioxidant Properties: Roasted garlic retains many of the antioxidants found in raw garlic, which can help protect your body from oxidative stress.
– Anti-Inflammatory Effects: Garlic is known for its anti-inflammatory properties, which may help reduce the risk of chronic diseases.
– Digestive Health: Garlic can promote healthy gut bacteria, aiding in digestion and overall gut health. Roasting garlic also makes it gentler on the stomach compared to raw garlic.
Whole Wheat vs. Regular Pita
When it comes to pita chips, the choice between whole wheat and regular pita can significantly impact the healthiness of your snack:
– Fiber Content: Whole wheat pita contains more fiber than regular white pita. Fiber is essential for digestive health and can help you feel full longer, making it a great choice for snacking.
– Nutritional Value: Whole wheat pita packs more vitamins and minerals, including B vitamins, iron, and magnesium. These nutrients are vital for energy production and overall health.
– Flavor Profile: Whole wheat pita has a nuttier taste that pairs exceptionally well with the flavors of hummus, enhancing your overall snacking experience.
Conclusion
Garlic Bliss Hummus with Crunchy Pita Chips is not just a recipe; it’s an experience that brings together rich flavors, textures, and nutritional benefits. This delightful dish can be enjoyed in various settings, whether as an appetizer at a gathering, a healthy snack, or a nutritious meal component. The combination of creamy, garlicky hummus and crispy, well-seasoned pita chips is sure to impress anyone who tries it.
Embrace the joy of cooking and savor the flavors of this exceptional recipe. By preparing your hummus and pita chips from scratch, you not only control the ingredients but also create a dish that is both wholesome and delicious. So gather your friends or enjoy it solo, and dive into this delightful culinary adventure.
