
Cheddar Hatch Chili Pull-Apart Rolls Recipe
Introduction
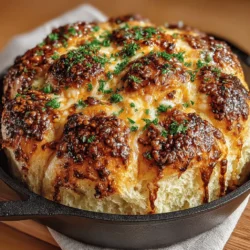
Pull-apart rolls have earned a special place in the hearts of home cooks and food enthusiasts alike. Their soft texture and delightful ability to be torn apart make them a favorite at gatherings, family dinners, and even as a comforting snack. Imagine a warm basket of rolls, each one a perfect bite-sized morsel, beckoning with the promise of cheesy goodness and a hint of spice. Enter Cheddar Hatch Chili Pull-Apart Rolls—a dish that elevates the classic roll with a unique flavor profile that combines the richness of sharp cheddar cheese with the mild heat of hatch chilies.
What sets these pull-apart rolls apart is not just their delicious taste but also their versatility. They can be served as an appetizer at a party, a side dish for a family meal, or even enjoyed solo while binge-watching your favorite series. The combination of cheese and chilies creates a compelling taste experience that caters to both cheese lovers and those who enjoy a bit of heat. This recipe is not just a treat for the taste buds; it’s an invitation to gather around the table and share something special with loved ones.
Understanding the Key Ingredients
To truly master the art of making Cheddar Hatch Chili Pull-Apart Rolls, it’s essential to understand the role of each ingredient in the recipe. Each component contributes to the dough’s flavor, texture, and overall success.
All-Purpose Flour
All-purpose flour is the backbone of any bread recipe, and these pull-apart rolls are no exception. It provides the structure needed to support the rolls while allowing them to rise beautifully. The protein content in all-purpose flour creates gluten when mixed and kneaded, which gives the rolls their chewy texture. Using the right amount of flour is crucial; too little can result in flat rolls, while too much can make them dense.
Active Dry Yeast
Active dry yeast is the magic ingredient that brings these rolls to life. It is responsible for leavening the dough, allowing it to rise and develop a light, airy texture. When activated properly, yeast produces carbon dioxide, which creates the bubbles that give the rolls their fluffy quality. Knowing how to activate yeast—by dissolving it in warm liquid with a bit of sugar to feed it—is a key skill in baking.
Warm Milk
Warm milk plays a dual role in this recipe. Not only does it help to activate the yeast, but it also enriches the dough, enhancing its flavor and tenderness. The warmth of the milk is critical; it should be heated to about 110°F, which is warm enough to activate the yeast without killing it. This delicate balance is essential for achieving the perfect rise.
Sharp Cheddar Cheese
The star of the show, sharp cheddar cheese, adds a robust flavor that pairs beautifully with the mild heat of hatch chilies. Its melting properties contribute to the gooey texture of the rolls, creating pockets of cheesy goodness in every bite. The sharpness of the cheese contrasts with the sweetness of the dough, making each roll a delightful experience.
Hatch Green Chilies
Hatch green chilies are a defining feature of this recipe. Known for their mild to medium heat and unique flavor, they bring a depth of taste that elevates the rolls from ordinary to extraordinary. Whether you choose to use fresh or canned hatch chilies, it’s essential to note that the flavor can vary. Fresh chilies can be roasted to enhance their sweetness, while canned options are a convenient alternative that still offer great taste. When selecting your chilies, consider your heat tolerance and desired flavor intensity.
Other Ingredients
In addition to the primary ingredients, a few others play vital roles in achieving the perfect pull-apart rolls. Sugar helps to feed the yeast and enhances the overall flavor, while butter adds richness and moisture to the dough. An egg contributes to the structure and adds a beautiful color to the finished rolls. Finally, garlic powder and onion powder lend subtle flavors that round out the taste profile, ensuring that every bite is bursting with flavor.
Step-by-Step Guide to Making Cheddar Hatch Chili Pull-Apart Rolls
Activating the Yeast
The first step in creating your Cheddar Hatch Chili Pull-Apart Rolls is to activate the yeast. This is a crucial process that ensures your rolls will rise properly. Begin by measuring out the warm milk and pouring it into a mixing bowl. Add a teaspoon of sugar to the milk, which will help feed the yeast. Then sprinkle the active dry yeast over the surface of the milk and let it sit for about 5 to 10 minutes. During this time, you should see the yeast start to foam and bubble, indicating that it is alive and ready to work its magic. If there’s no foam after this time, it’s best to start over with fresh yeast, as this means it hasn’t activated properly.
Making the Dough
Once your yeast is active, it’s time to make the dough. In a large mixing bowl, combine the activated yeast mixture with the remaining ingredients: all-purpose flour, melted butter, the egg, garlic powder, onion powder, and salt. Stir the mixture with a wooden spoon until it begins to come together. At this stage, you’re looking for a sticky dough that pulls away from the sides of the bowl but still clings to your hands. If the dough is too wet, you can gradually add a little more flour, but be cautious not to add too much, as this can lead to dry rolls.
After the ingredients are combined, transfer the dough to a floured surface and knead it for about 5 to 7 minutes, until it becomes smooth and elastic. This step is essential as it develops the gluten, which gives the rolls their structure. You’ll know the dough is ready when it springs back when lightly pressed.
Now that you have your dough ready, it’s time to incorporate the sharp cheddar cheese and hatch chilies. Gently fold in the cheese and chilies until they are evenly distributed throughout the dough. This step adds flavor and texture, ensuring that every bite is a delicious combination of cheese and heat.
With the dough prepared, you will be ready to move on to the next steps, including shaping the rolls and allowing them to rise, which will lead to the final baking process. The anticipation of pulling apart a warm, cheesy roll filled with the subtle heat of hatch chilies is just around the corner.
{{image_2}}
Kneading the Dough
Kneading is a crucial step in the bread-making process, especially for pull-apart rolls. This technique helps develop gluten, which is essential for creating the chewy, airy texture that makes these rolls irresistible. When you knead the dough, you’re not just mixing ingredients; you’re working the proteins in the flour until they form a strong, elastic network. This network traps the gases produced by the yeast during fermentation, resulting in beautifully risen rolls.
To knead your dough, turn it out onto a lightly floured surface and push it away from you with the heel of your hand. Fold the dough back over itself, rotate it a quarter turn, and repeat the process. Knead for about 8-10 minutes until the dough becomes smooth and elastic. A well-kneaded dough will spring back when poked gently and should not be overly sticky.
Incorporating Fillings
Once your dough is ready, it’s time to incorporate the star ingredients: shredded cheddar cheese and diced hatch chilies. To ensure an even distribution of flavors throughout your rolls, follow these handy tips:
1. Roll Out the Dough: After the first rise, turn the dough out onto a floured surface and roll it into a rectangle, about 1/4 inch thick.
2. Spread the Fillings: Evenly sprinkle the shredded cheese and diced hatch chilies over the surface of the dough. Be sure to leave a small border around the edges to prevent the fillings from spilling out during the rolling process.
3. Roll It Up: Starting from one of the longer sides, tightly roll the dough into a log shape. This technique will help keep the fillings contained and create those beautiful layers once baked.
4. Cut into Pieces: Slice the rolled dough into 12 equal pieces. A sharp knife or a bench scraper works best for clean cuts.
First Rise
After shaping the rolls, you’ll want to let them rise again. This first rise is crucial for developing flavor and texture. As the dough rests, the yeast continues to work, producing carbon dioxide that causes the dough to expand. The longer you allow the dough to rise (typically 30 to 60 minutes in a warm place), the deeper and more complex the flavors will be.
Cover the rolls with a clean kitchen towel or plastic wrap to prevent them from drying out during this time. You’ll know they’re ready when they’ve roughly doubled in size and feel puffy to the touch.
Forming the Rolls
The way you arrange your rolls in the baking dish can significantly affect their final appearance and texture. Here’s how to achieve optimal results:
1. Prepare Your Baking Dish: Grease a 9×13-inch baking dish with cooking spray or butter to prevent sticking.
2. Place the Rolls: Arrange the cut pieces of dough in the baking dish, placing them close together but not touching. This will encourage them to rise upward instead of spreading out.
3. Final Touches: For an extra pop of flavor, consider brushing the tops of the rolls with melted butter and sprinkling a pinch of sea salt or garlic powder right before the second rise.
Second Rise
The second rise is equally important for achieving puffy, light rolls. This step allows the gluten to relax and the yeast to continue fermenting, resulting in a tender crumb. The second rise usually takes about 30 minutes to an hour, depending on the temperature of your kitchen. Look for the rolls to have expanded significantly, almost touching each other.
Baking
To achieve that golden-brown crust and a soft interior, preheat your oven to 350°F (175°C). Baking at this temperature allows the rolls to cook evenly without burning. Place the baking dish in the oven and bake for about 25-30 minutes. The rolls should rise further and turn a beautiful golden color.
To test for doneness, insert a toothpick into the center of one of the rolls. If it comes out clean or with just a few crumbs, they are ready to be removed from the oven. Be cautious not to overbake, as this can lead to dry rolls.
Cooling and Serving
Once baked, allow the rolls to cool in the pan for about 10 minutes before transferring them to a wire rack. This resting period helps set the texture and makes it easier to handle them without squishing.
For serving, consider presenting the rolls in a rustic basket lined with a cloth napkin for a charming touch. These cheddar hatch chili pull-apart rolls can be enjoyed warm or at room temperature, making them a versatile addition to any meal.
Serving Suggestions
These delectable rolls can be served in various ways to enhance your dining experience:
– Presentation Ideas: Serve the rolls in a large, decorative bowl or on a wooden board. Drizzle with melted butter and garnish with fresh herbs for an eye-catching display.
– Pairing Recommendations: They pair wonderfully with soups, such as a creamy tomato basil or a hearty chili. Salads also complement these rolls, especially those with a tangy vinaigrette that cuts through the richness of the cheese. For a fun twist, consider serving them with a spicy dipping sauce or a creamy ranch dip.
Nutritional Information
Understanding the nutritional profile of your homemade cheddar hatch chili pull-apart rolls can help you enjoy them guilt-free. Here’s a breakdown of the health benefits and nutritional value of the main ingredients:
– Cheddar Cheese: Rich in calcium and protein, cheddar cheese contributes to bone health and muscle maintenance. It also contains vitamins A and B12.
– Hatch Chilies: These chilies are low in calories and packed with antioxidants. They provide a good source of vitamins C and A, promoting a healthy immune system and skin.
– Flour: While primarily a source of carbohydrates, using whole wheat flour can increase fiber content, aiding digestion.
On average, each roll contains approximately 150 calories, with a balance of carbohydrates, protein, and fats, depending on the specific ingredients used.
Conclusion
Making homemade cheddar hatch chili pull-apart rolls is a delightful experience that brings joy to both the cook and the diners. The combination of gooey cheese and the subtle heat of hatch chilies creates an irresistible flavor that is sure to impress.
Don’t hesitate to explore variations of this recipe by incorporating different types of cheese, adding spices like cumin or paprika, or even experimenting with various fillings such as herbs or roasted garlic.
We encourage you to share this recipe with friends and family, creating a memorable culinary experience that everyone will enjoy. Homemade rolls are perfect for gatherings, special occasions, or simply enhancing your weeknight meals. Happy baking!