
Crunchy Coconut Crusted Chicken: A Tropical Twist on a Classic Favorite
As a child, the dinner table was often a stage for culinary adventures, where my family gathered to explore a world of flavors. Among the many dishes my mother prepared, one that consistently captivated our senses was her coconut chicken. It was more than just a meal; it was an experience that transported us to tropical beaches lined with palm trees and sun-soaked shores. The crunchy exterior enveloped juicy chicken, creating a delightful contrast that was both satisfying and indulgent. This dish became a beloved staple in our home, a comfort food that resonated with cherished memories of family gatherings and laughter.
Inspired by those unforgettable moments, I am thrilled to share my own take on this classic dish—Crunchy Coconut Crusted Chicken. This recipe encapsulates the essence of tropical cuisine while remaining straightforward enough for any home cook to master. Whether you’re preparing a casual weeknight dinner or hosting a festive gathering, this dish promises to impress your family and friends alike. With its enticing aroma and vibrant presentation, Crunchy Coconut Crusted Chicken is sure to become a favorite in your culinary repertoire.
Gathering Your Ingredients
Before we embark on this delicious journey, let’s ensure we have everything we need to create this mouthwatering dish. The Crunchy Coconut Crusted Chicken recipe serves four and combines a delightful medley of textures and flavors that will create a feast for your taste buds. Here’s what you’ll need to prepare this tropical delight:
– 4 boneless, skinless chicken breasts: The foundation of our dish, chicken breasts provide a lean and juicy canvas for the coconut crust.
– 1 cup all-purpose flour: This will help the coating adhere to the chicken, creating a deliciously crunchy exterior.
– 2 large eggs: The eggs act as a binding agent, helping the breadcrumbs and coconut stick to the chicken.
– 1 tablespoon water: This will be mixed with the eggs to create an egg wash, ensuring an even coating.
– 1 cup unsweetened shredded coconut: For that distinct tropical flavor and crunch, shredded coconut will be the star of our crust.
– 1 cup panko breadcrumbs: These Japanese-style breadcrumbs add an extra layer of crispiness, enhancing the overall texture of the dish.
– 1 teaspoon garlic powder: A touch of garlic powder adds depth and richness to the flavor profile.
– 1 teaspoon smoked paprika: This ingredient will impart a subtle smokiness that complements the sweetness of the coconut.
– 1 teaspoon onion powder: Another layer of flavor, onion powder enhances the savory aspects of the dish.
– 1 teaspoon salt: Essential for bringing out the flavors of the chicken and the coating.
– ½ teaspoon black pepper: A hint of black pepper adds a mild kick and balances the sweetness of the coconut.
– ½ teaspoon cayenne pepper (optional for heat): If you enjoy a bit of spice, this optional ingredient will provide a delightful kick to the dish.
– ¼ cup vegetable oil (for frying): This will be used for frying the chicken, giving it a golden-brown crust.
Once you have all your ingredients ready, we can move on to the preparation steps that will lead us to the final dish.
Preparing the Chicken
To begin, we’ll prepare the chicken breasts. Start by patting the chicken dry with paper towels. This step is crucial because it ensures that the coating adheres properly and prevents the chicken from becoming soggy during the cooking process. After drying, you can lightly pound the chicken breasts to an even thickness. This not only helps them cook evenly but also results in a juicier final product. A meat mallet or even a rolling pin can do the job effectively.
Next, season the chicken breasts with salt, black pepper, garlic powder, onion powder, and smoked paprika. This seasoning blend infuses the chicken with flavor from the inside out. Ensuring each piece is well seasoned will elevate the dish, making every bite burst with flavor.
Setting Up Your Breading Station
Now that our chicken is seasoned, it’s time to set up the breading station. This is where the magic happens, transforming plain chicken into a crunchy, tropical masterpiece. You’ll need three shallow bowls for the breading process:
1. First Bowl: Place the all-purpose flour in the first bowl. This will serve as the first layer of coating and will help the egg wash adhere to the chicken.
2. Second Bowl: In the second bowl, whisk together the eggs and water until well combined. This egg wash will be the glue that holds the coconut and panko breadcrumbs to the chicken.
3. Third Bowl: In the third bowl, combine the shredded coconut, panko breadcrumbs, cayenne pepper (if using), and a pinch of salt. Mix these ingredients together to ensure an even distribution of flavors.
Breading the Chicken
With our breading station set up, it’s time to coat the chicken. Take one chicken breast and first dip it into the flour, ensuring it is fully coated. Shake off any excess flour, then dip the chicken into the egg wash, allowing any excess to drip off before moving to the final bowl. In the third bowl, press the chicken into the coconut and panko mixture, making sure to cover it thoroughly. Press down gently to ensure the coating adheres well. Repeat this process for each chicken breast until they are all coated.
Cooking the Chicken
Once your chicken is breaded and ready, it’s time to cook! Heat the vegetable oil in a large skillet over medium-high heat. You’ll want the oil to be hot enough that it sizzles when you add the chicken, but not so hot that it burns the coating. Depending on the size of your skillet, you may need to cook the chicken in batches to avoid overcrowding, which can lead to steaming instead of frying.
Carefully place the breaded chicken breasts in the hot oil and cook for about 4-5 minutes on each side, or until they are golden brown and cooked through. The internal temperature of the chicken should reach 165°F (75°C) for safe consumption. You can use a meat thermometer to check this, ensuring perfectly cooked chicken every time.
With the first part of our cooking process complete, you’ll soon have a deliciously crunchy and flavorful dish that embodies the spirit of the tropics. The enticing aroma will fill your kitchen, creating anticipation for the delightful meal to come. In the next section, we will explore serving suggestions and accompaniment ideas to take your Crunchy Coconut Crusted Chicken to the next level.
{{image_2}}
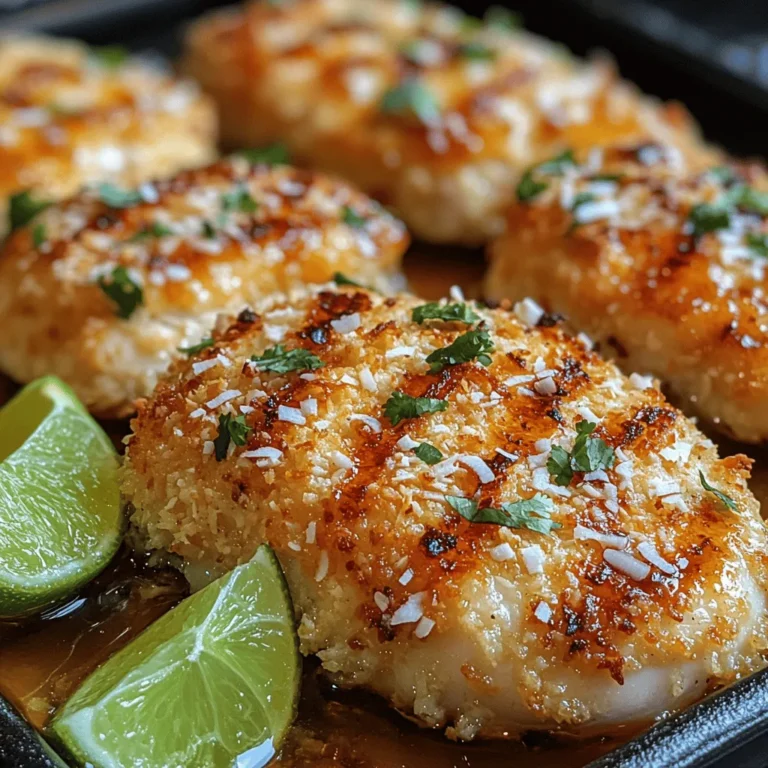
Fresh Lime Wedges and Cilantro Garnish
To elevate the flavor of your Crunchy Coconut Crusted Chicken, serve it with fresh lime wedges and a sprinkle of chopped cilantro. The zesty lime juice adds a refreshing brightness that cuts through the richness of the chicken, while the cilantro brings a vibrant herbaceous note that complements the dish perfectly. Together, these garnishes enhance the overall taste, making each bite a delightful experience.
Preparation Steps: Crafting Your Coconut Crusted Chicken
Creating the perfect Crunchy Coconut Crusted Chicken is all about the right technique and the right ingredients. Here’s how to bring it all together:
Step 1: Set Up Your Breading Station
Begin by setting up a breading station with three shallow bowls. This setup will streamline the coating process:
1. First Bowl: Place flour for dredging the chicken. The flour helps create a dry surface that the egg can adhere to.
2. Second Bowl: In this bowl, whisk together eggs and a splash of water until smooth. This egg wash acts as the glue that binds the coating to the chicken.
3. Third Bowl: Combine shredded coconut with panko breadcrumbs, garlic powder, smoked paprika, onion powder, salt, black pepper, and cayenne pepper (if you want a kick). Mix everything well, ensuring an even distribution of spices and flavors.
Step 2: Prepare the Chicken
Next, prepare your chicken breasts for breading:
1. Rinse the chicken breasts under cold water and pat them dry with paper towels. This step is essential for ensuring the coating adheres well.
2. Lightly season each breast with salt and black pepper. This seasoning is crucial for enhancing the chicken’s natural flavor.
Step 3: Coat the Chicken
Now for the fun part—coating the chicken! Follow these steps:
1. Dredge each chicken breast in the flour, ensuring it’s completely coated. Shake off any excess flour to avoid clumping.
2. Dip the floured chicken into the egg mixture, allowing the excess to drip back into the bowl.
3. Press the chicken into the coconut-panko mixture, turning it over until it’s fully covered. Gently press down on the coating to help it stick better.
Step 4: Frying to Perfection
With your chicken coated and ready, it’s time to cook:
1. Heat vegetable oil in a large skillet over medium-high heat. You want the oil to be hot but not smoking. A quick test is to sprinkle a small amount of the coconut-panko mixture into the oil; if it sizzles immediately, you’re ready to cook.
2. Carefully place the coated chicken breasts into the hot oil, making sure not to overcrowd the skillet. Fry for about 4-5 minutes on each side, until the chicken is a beautiful golden brown and reaches an internal temperature of 165°F (75°C). The sound of sizzling will be music to your ears, indicating that your chicken is cooking beautifully.
3. Once cooked, transfer the chicken to a plate lined with paper towels to absorb any excess oil. Let it rest for a few minutes—this helps retain the juiciness of the chicken.
Tips & Tricks for the Perfect Crunchy Coconut Crusted Chicken
Creating a crispy coating can sometimes be tricky, but with these tips, you’ll be a pro in no time:
– Double Coating: For an extra-crispy texture, consider double-coating the chicken. After the first dip in the egg and coconut mixture, repeat the process for a thicker crust. This technique adds a delightful crunch that elevates the dish.
– Oil Temperature: Ensuring the oil is at the right temperature is crucial. If the oil is too cool, the chicken will absorb more oil and become greasy. If it’s too hot, the coating may burn before the chicken is cooked through. Ideally, aim for a temperature of around 350°F (175°C) for perfect frying.
– Baking Option: If you prefer a healthier version, you can bake the chicken instead. Preheat your oven to 400°F (200°C) and place the coated chicken on a baking sheet lined with parchment paper. Spray lightly with cooking spray and bake for about 20-25 minutes, flipping halfway through to ensure even cooking.
Delicious Variations to Try
Once you’ve mastered the Crunchy Coconut Crusted Chicken, consider experimenting with these delicious variations:
– Spicy Coconut Chicken: For those who love a kick, add more cayenne pepper to the coconut-panko mixture or serve with a spicy dipping sauce made from sriracha and mayonnaise.
– Herbed Coconut Chicken: Add finely chopped fresh herbs such as parsley or thyme to the coconut-panko mixture for an aromatic twist.
– Tropical Coconut Chicken: Serve the chicken with a pineapple salsa made from diced pineapple, red onion, jalapeño, lime juice, and cilantro for a tropical flair.
Serving Suggestions
The Crunchy Coconut Crusted Chicken is versatile and pairs well with a variety of sides. Here are some serving suggestions to elevate your meal:
– Citrus Salad: A fresh salad with mixed greens, avocado, and citrus segments drizzled with a light vinaigrette complements the richness of the chicken.
– Rice or Quinoa: Serve the chicken over a bed of coconut rice or quinoa for a filling and flavorful meal. The coconut in the rice can enhance the overall coconut theme of the dish.
– Roasted Vegetables: Pair with roasted seasonal vegetables like sweet potatoes, bell peppers, or asparagus for a colorful and nutritious plate.
– Dipping Sauces: Offer a variety of dipping sauces such as sweet chili sauce, honey mustard, or a cilantro-lime yogurt sauce to add extra flavor options.
Conclusion
Crunchy Coconut Crusted Chicken is more than just a meal; it’s an experience that brings together flavors and textures in every bite. With its crispy coating, juicy chicken, and the bright freshness of lime and cilantro, this dish is sure to become a favorite in your home. Whether you choose to fry or bake, the result will be a delightful, satisfying dish that’s perfect for any occasion—from family dinners to casual get-togethers.
So gather your ingredients, set up your breading station, and get ready to impress your family and friends with this delicious tropical-inspired chicken. Enjoy the process, and don’t forget to share your culinary creations!
